Celebrating diversity and making lemonade...

Celebrating diversity and making lemonade...

Sunday, December 19, 2021

Perry Christmas! Making perry and roasting chicory! Cheers!

 In the Kitchen

Tried something new this fall and made perry!  Perry is similar to hard apple cider.  Apple cider is made with apples and perry is made with pears.  I started the perry a couple of months ago when the pears were dropping off the trees and just bottled it up a couple of days ago.  Now, it will age for a few months!  Of course, I will be giving it a taste on Christmas...Perry Christmas!

Here is a brief look at how I made it.  The first step was to make the pear juice.  I used my steamer juicer for this step.  The side benefit of this step is that it also pasteurizes the juice so I don't have to do this later.  Yes, you can ferment unpasteurized juice but I like to start with a "clean" juice and add the yeast in a controlled manner (this is because I am a control freak).

Another benefit of the steamer juicer is that I took the juiced pears and ran them through a Squeezo Strainer (thank you Julie Skinner) and made some pear sauce!  I will use this for baking.  It is great for eating too but Mark prefers applesauce.  Now, I can use the pear sauce for baking and keep all our applesauce for eating.  Win!  Win!

Back to the perry...after collecting the juice, I checked the specific gravity with a hygrometer.  This is a measure of the sugar that is in the juice.  The yeast will eat the sugar in the pear juice and turn it into alcohol.  One thing of note: the yeast feed on fructose.  Pears contain sorbitol sugar in addition to fructose.  The fructose is "eaten" but the yeast cannot eat sorbitol.  Therefore, perry should be naturally more sweet than apple cider because of the sorbitol.  I love this about pears!
I added the yeast and let it work...
 
After a couple of weeks, the ferment calmed down and I racked it into another gallon jug.  I left it for another couple of months.  Then, I added a small amount of sugar to each bottle and let it go through a secondary ferment so that it will be bubbly when it is opened to drink!  I did make some hard apple cider a couple of years ago and you can read more about that by clicking HERE.  I have also made apple wine and I really like it even better than the hard cider!  Here is the perry all bottled up and going through a second ferment...I will put it in the fridge on Friday!


In the Herb Garden

When the temperatures get cool, I pull up the chicory plants in the food forest and herb garden and process the roots.  I wash them, dehydrate them, roast them and then grind them.  I had read that chickens like chicory greens and that is why I planted them initially.  I didn't even know that the roots could be used!  Chicory is a caffeine free coffee substitute.  It brews a rich dark roast with a robust flavor and a slightly woody, nutty taste.  I like to put a little cinnamon, sweetener and milk in mine.  I wrote a blog post about making chicory coffee a couple years ago and you can find it HERE.

I gave the ducks the tops of the chicory to eat and they just LOVED it!  Here is a picture of before they ate it...
Here is a pic of the chicory after they were done.  They pretty much stripped all the leaves off.
Here I tried to get a pic of some of the roots...this is a perennial plant so it produces a large tap root!
Some benefits of chicory:
CHICORY INULIN POWDER (Cichorium Intybus) – Extremely high in inulin, an important prebiotic fiber that supports gut health
HIGH DIETARY FIBER | SUPPORTS DIGESTIVE HEALTH – This dark roast coffee with naturally occurring inulin fiber, helps boost fiber intake, and promotes the growth of key gut bacteria essential for healthy digestion
CAFFEINE FREE COFFEE SUBSTITUTE – Features a delicious, roasted coffee-like taste, and supports a healthy alternative to hot caffeinated drinks. Perfect for coffee lovers!  You can also mix some chicory into your coffee grounds to lower the caffeine and acidity of your coffee.

It is fun to make drinks from plants that we grow and forage for on the farm.  I also dry some peppermint leaves for making peppermint tea and lemon verbena makes a lovely hot lemony drink.  There are so many great herbs to grow and use in the kitchen.  The possibilities seem limitless!
Cheers!
~Denise


Sunday, December 5, 2021

Egg bound chicken?

 In the Coop

Well, here goes another "never say never" story...

On Friday, November 26th, I went to go put the chickens up for the night and one of them could not walk straight.  It almost looked like she had been drinking a little too much and was staggering around drunk.  I picked her up and put her in the quarantine cage.  I was in a hurry so I didn't give it much thought.  In the past, I have put chickens in there that looked a little "off" and in the morning they are just fine.  BUT...I was a little worried about this one and prepared myself to come out and find a dead chicken the next morning.  

Saturday morning I went out to the chicken barn and she was still standing upright!  Yeah!  I had a busy day so I just left her in the cage because she still didn't seem totally right so I didn't want to let her out of the cage.  Finally, on Sunday afternoon, I had some time to start googling.  Almost immediately, I found a picture of an egg bound chicken and I knew this must be the problem.  She is standing with her tail down and her feet wide apart and kind of walking like a penguin (which is not natural).
She was also lethargic, puffed up and squatting like she was trying to lay an egg.  All these are symptoms of a chicken being egg bound.  Egg binding can happen when a chicken is trying to lay a particularly large or misshaped egg.  Also, if there is an internal infection in reproductive tract, this may cause a hen to be egg bound.  

Now that we have diagnosed the problem, what can be done?  The first thing that was noted on many websites is that a chicken that is egg bound can die if the egg is not expelled with 24-48 hours.  You see, a chicken has a vent and everything goes out that vent...the egg and the feces.  Chickens don't pee so they lay some pretty soft, squishy poop out of their vent.  If a chicken is egg bound, it also means that they cannot poop.  This is not good and time was not on our side because she had already been in the quarantine cage almost 48 hours!  

Side note:  Because chickens are prey animals, they hide things quite well.  Chickens won’t show their symptoms until they are really, really sick.  Also, since they live in a pecking order, they don't want to show to the other chickens that they are weak or they will get bullied.

After more googling (here is a link to a great article about How to Identify and Treat an Egg Bound Chicken), it looks like you are supposed to give the chicken a warm bath.  The warm water works as a muscle relaxer to loosen things up in there and to get the egg to pass.  I put some warm water in a tub and added some Epsom salt too.  Several articles I read said that you could massage the abdomen to encourage things to start moving.  The first time I gave her a soaking bath, she did not want me to touch her belly area so I just left her in there to soak for about 20 minutes.  I also crushed up some Tums and put them on top of her food and in her water.  I had read to try and give her calcium.  I guess calcium induces contractions and will help to get that egg out.   

We dried her off and put her into her quarantine cage and kept her in the house.  We wanted her in a warm spot since she had just been in a soaking tub and was wet.  On Monday morning, she was still alive (yeah again!) but no egg or poop had been expelled...back into the tub for an early morning soak.  This time she let me massage her abdomen and it felt kind of squishy.  She was really not eating much so I gave her a bone from a steak that we had eaten the night before.  She really liked that.  

In the early afternoon, I gave her another bath.  We could see her vent working but nothing was coming out.  It was then that I made a decision that I said I was NEVER going to do...take a chicken to the vet.  I called over to the WSU Veterinary Hospital and they said to bring her over...
Unfortunately, the vet did not think she could be saved.  She said there was more going on that just being egg bound.  She said that she may have had some internal infection (remember that "squishy" stomach).  We let them put her down and some of the students will get to cut her open and see what was going on.  I hope the vet students can learn something...a silver lining?  So grateful that the vet was super nice and did not charge us an emergency fee for bringing her in.  

This is sad but unfortunately, it just happens sometimes.  I can think of at least 2 other times when I walked into the barn or coop and just found a dead chicken and one dead duck.  I think this chicken was in a lot of pain so it was best to just have her put down than to suffer.  We tried our best to help her.  You win some and you lose some.  The best part is that we learned about what an egg bound chicken looks like and we know what to do to help in the future.

Have an eggcellent day!
~Denise


Sunday, November 21, 2021

Apple Cider Vinegar (ACV)

In the Kitchen

Many years ago I started to make our own apple cider vinegar.  It was my first attempt at fermenting something.  Then, when we bought the farm, it was fortuitous that there are 50 apple trees on the property!   AND the apples from those trees were picked and taken to a vinegar plant in downtown Moscow in the mid-1900's.  Here is a pic of the vinegar plant at the corner of Main and C Street in the 1920's.  It was demolished in the 1950's or 60's...my sources were not precise on the demolition timing...

The neighbor said that the trees are mostly Ben Davis apples.  These apples were popular in the the late 1800’s because they had good storage qualities and could be transported successfully over long distances.  This means that most of the trees on our property now are over a hundred years old...no wonder they are so tall!  One interesting fact that I found is that the Ben Davis apple was crossed with McIntosh to make the Cortland apple.  I think you probably will not find a Ben Davis apple in your local grocery store but you may be able to locate a Cortland and McIntosh.  Her is a pic I took a couple of years ago showing some of the different apples on our property...the first apple in the pic is what I would consider a Ben Davis apple.  I am not sure about the other apples.  The third one could be a McIntosh.  There is only a couple trees that produce these more red colored apples.  There are about 3 crabapple type trees (last apple).  Crabapples bloom early so this is to make sure that there is plenty of blooms available for pollination in the spring.  

It is easy to make your own apple cider vinegar.  You just need to get some apples and it helps to start with some vinegar to inoculate the batch and get it fermenting.  The sugar and pectin in apples reacts with beneficial yeast and bacteria to make the "mother".   The mother is what holds all the nutrition and healing properties.  If you buy some ACV from the store, make sure it says "raw" apple cider vinegar.  Braggs is a popular brand that contains living mother.

Here is how I make Apple Cider Vinegar

1. Fill a half gallon jar about half full of warm (NOT HOT) water. MUST BE UNCHLORINATED WATER.  If you only have chlorinated water, boil it or let it sit for 24 hours so chlorine can dissipate.

2. Add 1 cup of sugar and stir to dissolve.

3. Add 2 cups of chopped apple.  You can also use scraps, like peelings, to make the vinegar.  I would stick to using organic apples, if possible.

4. Add 1 cup of vinegar mother.

5. Fill the rest of the way up with warm water and then place a lid on so that NO PIECES OF APPLE ARE ABOVE THE WATER LINE.  I use a smaller jar as a type of lid to push the apple pieces under the water.  Do not use any metal or it may corrode.  


6. Cover with coffee filter and wrap towel around jar and set in a dark area that is about 70 degrees.  This allows it to breath but keeps fruit flies out.  Leave for 3-4 weeks.


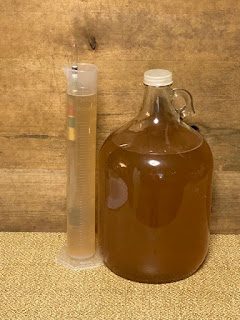
7. Strain off vinegar.  Give apples to your chickens!  Save 1 cup of the vinegar to start your next batch.  You should have harvested about 1 ½ quarts of vinegar BUT IT’S NOT READY YET…  


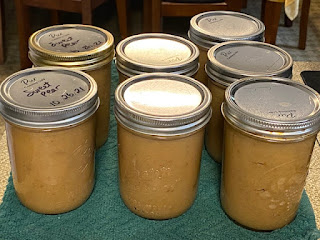
8. Pour freshly harvested vinegar into new jars and let sit another 4 weeks to age.  Again, no metal lids (I know the middle jar in this pic has a metal lid but I was gifting it to someone that was going to use it right away and I was out of plastic lids!)  Now, after aging 4 weeks, the ACV is ready to use!

I just read that you can put an eggshell into your ferment and this will add a little calcium to your ACV.  I would add it in when you make the initial batch with the apples.  I have never done this before but I am going to give it a try.

Some tips to make your ACV fermentation successful

Keep your ACV ferment in a different place than other ferments in your home i.e. I keep my kombucha in a closet downstairs and my ACV in a pantry upstairs.

The longer you give the vinegar to ferment, the stronger the taste and tang will be.  When the vinegar is to your liking, you can put it in the refrigerator to stop the fermenting.

The length of the fermentation process will vary based on the temperature in your home.  During summer, the ACV will take less time to ferment. In winter, it will likely take longer...however...we use a wood stove in our basement in the winter and it gets crazy hot down there in the winter so it just depends what the air temp is in your home...

If you see a gelatinous blob developing in the ACV, this is a “mother” and you can add it to your next ferment to get things going even faster.

Uses for ACV

Drink it!  ACV is a great probiotic.  It may not taste the best, but it is generally considered safe to add 1 Tablespoon of ACV to a cup of water to drink.  Beware…can erode tooth enamel…I am not going to go into all the health benefits associated with ACV in this post but if you are interested in reading more, here is a link to an article by Dr. Axe that is very thorough on this subject.

Use ACV as a substitute for plain vinegar in any cooking recipe; Use ACV instead of lemon juice in homemade mayonnaise

Homemade Broth – add a tablespoon of ACV to your bones to help get the minerals out

Make salad dressing:
2/3 cup olive oil
1/4 cup cider vinegar
1 tablespoon honey
2 teaspoons Dijon mustard
1 garlic cloves, minced
1/4 teaspoon salt
1/8 teaspoon pepper
Combine all ingredients in a jar with a tight-fitting lid; shake well. Store in the refrigerator. Just before serving, shake dressing again.

Water Bath Canner or Steamer Juicer – I add a tablespoon of ACV to the water in my canner/juicer to keep the minerals from building up inside

Fruit Fly Traps – I just pour some in a small dish and keep it near my composting container on my counter.  I also add a couple drops of dish soap to the dish.

Vinegar is an acid and is great for cleaning because it kills microorganisms...Make your own all-purpose cleaner with one part water and one part ACV.  Use it to clean hard surfaces in the kitchen and bathroom, including countertops, hard water stains, and drains.

Daily Shower Cleaner
1.5 cups water
1 cup vinegar
1/2 cup rubbing alcohol
1 teaspoon liquid dish soap (I like this kind– affiliate link)
15 drops lemon essential oil (these are my favorite essential oils ever)
15 drops melaleuca (tea tree) essential oil
Mix all the ingredients together in a quart-sized spray bottle.
Shake well, and spray onto shower surfaces every day after use.
Remember–this is designed as a maintenance spray, so I would suggest starting with a clean shower first. It won’t remove built-on grime by itself, it’ll just slow down the process.

Homemade Hair Rinses
After shampooing, just mix equal parts apple cider vinegar and water, massage into your hair, and rinse off. It helps remove buildup, it also works as a natural detangler and general scalp revitalizer. Best not to use this hair rinse if you have color treated hair.  Due to ACV's antimicrobial properties, it can help with alleviating dandruff.

Foot Soak
Mix equal parts apple cider vinegar and warm water with a tablespoon of Epsom salt. Soak your feet in the bath for 20 minutes. After soaking, rinse off feet and coat your feet in a hydrating cream, put on a pair of socks, and let the lotion sit on them overnight.

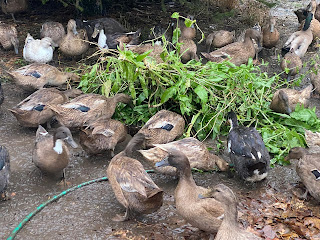
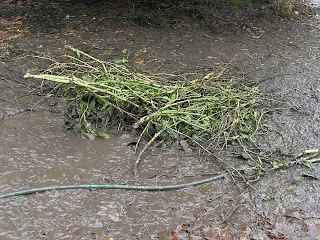
I love our old apple trees but, to be honest, they are not that pretty to look at...a lot of them have a bunch of dead wood in them but it is way up high to where we cannot reach it to trim it out.  When there are strong winds, a few branches get blown out.  We pick them up and save for the wood stove.  Apple wood is amazing for the fireplace!  It is a hardwood and burns crazy hot!  Also, our trees are infected with codling moth and so a lot of the fruit has little bug holes in it.  Luckily, we get so many apples that we can pick around the insect damage and still get lots of apples for making sauce and apple pie filling.  Once the chicken coops get finished, we are hoping that we can let the chickens out under the apple trees and get them to clean up some of the debris to keep the bug population under control...we will see...I could go on and on about apples...we just love them and feel so blessed to have these old trees on the property!

Have an eggcellent day!
~Denise


Sunday, November 7, 2021

New girls (and a BOY!) on the farm...

In the Coop

Have you heard that saying that goes "Never say never"?  This kind of falls into that category.  When we were planning Mark's egg business, we had an idea to raise our own birds to replace the older girls in the flock.  I did a lot of research and decided that Welsh Harlequin ducks would be great because they autosex.  This means that you can tell the male hatchlings from the female hatchlings.  You could separate the ducklings after they hatch and raise the males for meat and save the females for egg laying.  Well...then, I started doing some research on incubating eggs.  It is expensive because you need an incubator (that costs several hundred dollars to get a good one).  AND it is actually quite challenging to make sure the heat and humidity correct.  If one thing goes wrong, you can lose the whole hatch.  I realized that maybe this was not going to be an efficient way to start the egg business.  This is when I started looking into egg laying breeds and found the Golden Hybrid 300 ducks that we ended up purchasing.  The "300" means that these ducks are to lay 300 eggs a year.  We have gotten 2 batches of these ducklings and we like them just fine.  HOWEVER, I don't think we are getting close to 300 eggs a year from each duck.  

I recently saw a post in a homesteading Facebook group of some Khaki Campbell ducks available.  The mother of the drake laid 335 eggs in her first year!  SOLD!  We purchased 4 ducks and a drake.  BTW:  I saw someone else post that they had some of the Golden Hybrid 300 ducks and they did not think that they were getting that many eggs/year either.  They are great ducks but I just don't believe they are living up to their namesake.

In September, the new ducks came to the farm.  (There is a video at the end of the post of when we got them.)  They are about 8 weeks old in this pic and they all look pretty much the same.  

The big question is how do you sex them when they all look the same?  The lady that I got them from said she can voice sex them.  I did not really know what she was talking about.  I knew that drakes do not quack but I didn't know what noise they made.  One day I was out with the ducks and I heard a frog.  Then, I realized that it wasn't a frog...it was the drake!  Here is a short video of the drake.  He is 16 weeks old in this video and his head had turned a beautiful green color so it is pretty easy to tell him apart at this point.  He speaks at the 16 second mark in this video and again at the 1 minute and 5 seconds mark.
The Khaki Campbell ducks look very similar to the Golden Hybrid 300 ducks.  I have read that the Golden Hybrid 300 is a cross between a Khaki Campbell and a mallard duck.  The plan is in the spring to move the 4 ducks and the drake to their own shelter and fencing.  Then, we will let the ducks raise their own ducklings.  I think this may be a more successful way to raise ducklings than using the incubator.  Then, when the ducklings are around 7 weeks old, we would process the males and put the females back into the big flock of ducks.  This is why you need to be able to sex them at 7 weeks, it is easier to process ducks before they put on their pin feathers after 7 weeks of age.  
  
I just bought this portable shelter that we will use for the Khaki Campbell ducks and drake in the spring.
Here is a video of when we got the ducks.  I went to get them in the evening and had put them into a cage.  Then, we put the cage into the coop that evening but left the new ducks in the cage for the night.  I came in the next morning to let them out.  They were pretty high strung!  Of course, the mature ducks also picked on them because the pecking order is a real thing.  Please know that no ducks were hurt badly.  I watched them for quite a while and after the first day, they were pretty much assimilated into the flock with no problem.
I put fancy little yellow band on the new ducks but their feet were so small that the bands fell off!  I actually put new red bands on them a few weeks later.  They mostly hang together in a little group within the larger flock.  Here is a recent pic of the drake...I think he is quite handsome...it is a little difficult to see in the pic but he has his curly tail feather now!  This is another identifying characteristic of a drake...
I just gathered these eggs yesterday and we "may" be getting some eggs from the new ducks!  The egg in the middle is a regular sized duck egg.  The first egg is a double yolker.  When the ducks (and chickens) first start to lay, they give a lot of double yolkers as their little internal egg system is working out the kinks of how to lay an egg.  The third egg may be a pee wee duck egg.  It is about the size of a chicken egg.  So, the double yolker and the pee wee eggs may be from the new ducks!  
These are not the only new poultry to come to the farm.  The chickens are getting ready to molt.  When they molt, they lose their old feathers and grow new feathers.  This takes a lot of energy and they quit laying eggs while this happens.  To make sure we have enough eggs for Mark's delivery route, he bought some 10 month old pullets to add to the chicken flock a couple of weeks ago!

They are a Rhode Island Red and are known to be great egg layers.  They are a darker red color than the other girls so they are pretty easy to tell apart.  The chicken in the upper left is a new girl and the bottom right is one of the existing flock.
The contractor has come and parked his utility trailer at our property.  He said that he does not have a lot of other projects now so he will be finishing up the chicken coop (FINALLY!).  I am hoping he is correct and then we will be able to order some more chicks in a couple months and put them in the new coop!

So where does the "never say never" part come in?  After researching about incubating eggs, it just seemed like too much variables that might not work so I just thought we would never actually try to raise our own ducks but now we are!  We are going to try and let them raise their own babies and not do the incubator.  Hoping this works!

Have an eggcellent day!
~Denise


Sunday, October 24, 2021

Smoking seeds!

 In the Kitchen

I love seeds!  I love planting seeds, saving seeds and eating seeds!  Seeds are so healthy.  An egg is similar to a seed.  It has everything in it to grow a new organism!  Because of this, they are extremely nutritious (both seeds and eggs!).  Seeds have protein, fiber, healthy fats, and important vitamins, minerals and antioxidants.  When consumed as part of a healthy diet, seeds can help reduce blood sugar, cholesterol and blood pressure, boost digestive health, and fight free radial formation.  Here is a great article about seeds and how they are different from nuts, grains and beans.

I really enjoy putting both sunflower seeds and pumpkin seeds on my salads.  Sunflower seeds are high in vitamin E, thiamine and manganese. Pumpkin seeds are high in healthy fats and protein and rich in manganese, magnesium and phosphorus.  

A couple years ago I learned that you could grow hulless pumpkin seeds inside a pumpkin.  They do not have the harder, tan seed coat.  They are the green seeds.  I see them for sale in the grocery store as pepitos.  Well, this year I had a bumper crop of the pepito pumpkins!  Here is a pic of our barn cat, Apple Jack, sitting on the deck with the pumpkins in the background.  I think I had about 40 of them!
They are small pumpkins and the flesh is not really that good for eating.  I have learned how to scoop the seeds out, wash them and then put them into the dehydrator to dry them down for storage.  This year, I decided to try smoking some!  I also decided to try smoking some sunflower seeds.  This was actually a request from Joshua.  One day he asked if he could eat the sunflower seeds so I figured...why not?  This is what we did to smoke the sunflower and pumpkin seeds.  

First, I cut the pumpkins in half and scooped out the green seeds.  
I roasted the flesh part of the pumpkins and we fed that to the chickens and ducks!  Joshua enjoys feeding the ducks each afternoon when he gets home from school.  Here is a video of him feeding pumpkin and sunflower seeds to the ducks...
Here is a pic of the sunflower heads that we harvested seeds from...  
We were able to get gray colored seeds, some black seeds and striped seeds.
The next step is to boil the seeds in salt water.  I put 8 cups water in a pot and then added 1/4 cup salt. and boiled the seeds for 15 minutes.  When I boiled the sunflower seeds, they all turned black...but then when they dried back out, the color dissipated and you could see the different kinds again.
Then, I strained off the salt water and put them on metal trays.  I put them into the smoker at 230 degrees F.  I used hickory smoke for 2 hours and then continued to bake them in the smoker for a couple more hours.  I wanted to make sure they were nice and dry.  I also stirred the seeds every 30 minutes.  Let me reiterate, for long time storage, the seeds have to be bone dry or they will mold.
Finally, once they were dry, I gathered them up and put in a jar!  
They both taste amazing and I am happy that I decided to try something new with the pumpkin seeds.  This will definitely spice up my salads this winter!  Or they will be great just as a healthy snack!  The seeds in this jar are from about 5 pumpkins so I am going to have about 8 times that amount when I am done!  I am not going to do anymore of the sunflower seeds...I think these will keep us busy for a while!

One last note:  you can totally do this with the seeds you get out of your Jack-o'-lantern pumpkin!  Or seeds from you butternut squash!  Or any winter squash!  You know, the seeds with the shells!  They will be crunchier but we always roast some pumpkin seeds in the oven each year.  I really liked boiling in salt water because I can never get the salt to stick well after they have been roasted so this is a great hack to get nice salty seeds.  If you don't have a smoker, you can add some liquid smoke to the seeds before you roast them in the oven!  I usually put some butter/olive oil on the seeds before I roast them in the oven so you just add about a tablespoon of liquid smoke to the oil and mix it all together well and then roast in the oven.  Yum!!!

Have an eggcellent day!
~Denise


Sunday, October 10, 2021

Storing vegetables for winter

 In the Root Cellar

We got a freeze on the farm this past week!  This means I was running around trying to bring everything in so that it would not get ruined.  When we purchased the farm 4 years ago, I was most excited that there was a large root cellar located under the garage!  We have never had a root cellar before so I started doing some research.  I think most people know that you store vegetables in a root cellar for the winter because it stays cool.  One thing that I didn't realize is that a root cellar is not the best place to store everything!  Some items need humid conditions and some need dry conditions.  A root cellar has cool and humid conditions.  One of the first things I put into the root cellar was onions.  What I didn't know is that onions need cool and dry storage conditions.  The onions started to get some mold on them.  Also, the onions started sprouting because we have 2 windows in the side of the root cellar and light was coming in.  That problem was easy to fix and we covered the windows with boards.  Then, as mentioned in the last blog, we ended up putting an air conditioner in one of the windows and we use that to keep it at 40 degrees and because it is built partially underground, it has a good amount of humidity in our root cellar (it is at least 80% humidity).
Onions, garlic, squash, and potatoes need to be cured before storing.  I am pretty sure I did not properly cure my onions that first year either.  Curing involves leaving the vegetable in a warm, dry place for a couple weeks to allow the skin to thicken and toughen.  Potatoes should also be stored in a dark place so that they do not sprout or turn green because of the light.  Potatoes like cool and damp storage conditions.  After curing, I like to put the potatoes in a box with layers of shredded newspaper to allow for some ventilation and then I put that box in the root cellar. 
We store a lot of squash to feed to the chickens and the ducks in the winter.  I have been surprised to find that summer squash actually store pretty well.  Squash needs cool and dry conditions for storage.  I let them cure and then put into bins and place in a storage room of the house that we do not heat.

Once I get the container full, I put the squash on a shelf in a room of the house that stays cool.  I also have the onions and some sunflower heads here on these shelves.  In a perfect world, I would have the onions in a dark container so they cannot get too much light.  I will have to get some more containers...but we do have the windows blocked in this room too so not much light gets in.
Top to bottom...sunflower heads...summer squash...onions...on the right side you can see a bag of garlic hanging there...
Here is a pic of some of the winter squash that we will be eating this winter...I was mostly running around bringing these and the green tomatoes in from the garden last Tuesday.  From top to bottom are spaghetti squash, butternut squash, delicata (not sure all these are "ripe"...the unripe ones will be for the girls), also some banana squash and then buttercup squash...not pictured are a couple Baby Blue squash and pepito pumpkins...this is a good harvest...we have plenty of squash this year!
Root vegetables are easy to store and need cold and very moist conditions.  Root vegetables do not need to be cured.  In fact, it is best to pull them out of the ground and store them immediately.  I like to put them in layers of damp sand.  I have read that damp sawdust also works well.  I store carrots and beets this way.  One of the first years I grew beets, I canned some.  This was fine but it seems much easier to me to just store them in the root cellar now.  Side note:  the wet sand gets very heavy...I had to ask Henry to bring this in to the cellar after I filled it up in the garden.  Seriously thinking about switching to sawdust next year...
It is best to store larger root vegetables but the carrots just did not grow very big...if the small ones become rubbery, we will just use them for making broth...Joshua LOVES roasted carrots so I have a feeling that they will not last long...
I am experimenting with drying down some sunflower heads for seeds for the chickens and the ducks.  It is challenging to get them to dry down all the way.  They need to be completely dried or they will mold.  I looked at them today and noticed that some were getting a little fuzzy so I turned them over so the underside could dry out.  I think they would be best to dry on a screen but I don't have a huge screen to put them on...I will have to think about it a little more for next year...even though we got a good amount of sunflower heads, they will be used up in the next couple of weeks...the girls LOVE their sunflower seeds!
Speaking of seeds, I diligently saved some pea seeds a month ago when the plants started to dry down.  Luckily, I opened the jar the other day and noticed that they have weevils!  I guess the bugs must have been in the seed when I put them in the jar.  I picked some more pea seed and this time, I put it in the freezer for a week to keep any weevil eggs that may have been in there from hatching.  I am glad I decided to save some seed early in the season and realized my mistake...
I bought these special root cellar storage containers (to the left of the celery in the pic).  As you can see, it is mostly burlap and this allows for good ventilation.  I put the carrots and beets in these containers.  I dug up this celery from the garden and kind of "replanted" it in this large pot...it should be good for a few weeks...I like to dry it (when I have time) and can add it to soups this winter...
I have some apple wine in the root cellar.  I don't really want to store fresh apples long term.  Our apples have a LOT of insects so they are not ideal for storage.  I try to can them into applesauce or apple pie filling or dry them as we pick them so I am storing apples that way.  Also, since apples release ethylene, you have to be careful and not keep them near your potatoes or it will make your potatoes sprout.
I also store heads of cabbage in the root cellar.  They don't really need any special treatment...I just put them on the shelf and grab one when I need one.  You just have to peel off the outer layers of the cabbage because they will brown and dry out a little...the inside is all good.  I also put the watermelon in the root cellar but we will be eating these ASAP!  They will not keep more than a couple weeks.
I also store my ferments in the root cellar/cold room.  I have some dill pickles and fermented salsa in there right now.  Also, I just got finished making some cordita which is a mexican sauerkraut.  This is something new I am trying, along with cabbage, it also has shredded carrots, onions, and oregano in it.  
I tried to stay on topic...this is mostly what I store as whole vegetables in the fall...summer and winter squash, potatoes, onions, garlic, carrots, beets and cabbage.  I have heard of people storing tomatoes in the root cellar and wrapping each tomato in newspaper but I just can/ferment most of the tomatoes into salsa and sauce.

Busy busy time of year!  Have an eggcellent day!
~Denise


Sunday, September 26, 2021

Egg storage and Cold room

 Keeping it cool and eggs fresh...

When we were planning Mark's business, egg storage was an important consideration.  There are lots of regulations about cleaning and storing eggs to keep everyone safe.  Forewarning...there is a lot of technical information presented in todays blog post but I just wanted you to have all the background knowledge.  In some of my research, I learned that eggs stay freshest if stored at cool temperatures and high humidity.  Most refrigerators have cool and dry conditions.  I started to investigate about how we could increase humidity for the egg storage.  I actually looked into maybe getting a wine refrigerator/cooler.  Wine is best when stored at 50 C and 75% humidity.  Eggs are best when stored at 45 C (or lower) and 80% humidity.  Wine and eggs both need humidity to keep fresh and from drying out!  (FYI:  Wine cooler are also VERY expensive.)
See, when a hen lays an egg, a natural, protective coating is deposited on the outside of the shell.  This is referred to as the "bloom".  It is referred to as the egg cuticle and is a layer of protein that seals the porous shell.  This prevents bacteria from entering the egg and causing infection.  This protects a developing embryo if the egg has been fertilized.  The bloom also keeps unfertilized eggs fresh longer by preventing moisture loss and keeping contaminates out.  

When eggs are washed the bloom is also washed away, thus leaving the eggs more susceptible to spoiling – particularly when stored at room temperature.  That is why it is considered a food safety best practice to store eggs that have been washed in the refrigerator – store-bought or home-raised.  Because washed eggs are more porous, it is best to store them in an enclosed container within the refrigerator to reduce moisture loss and also the absorption of off-odors or bacteria. I bring all this up because we have to wash the eggs to be able to sell them off farm.

A few more words about egg anatomy and how to determine how fresh your eggs are...

Air inside the shell gives a chick the ability to breathe when needed during the development process.  As the egg ages, evaporation takes place and the air cell becomes larger.  The size of the air sac is one characteristic used to grade eggs.  For example, a bigger egg sac means it is an older egg.  

The egg white is comprised mostly of albumen and water. It contains approximately 40 different proteins and would provide food for the baby chick if this egg were fertilized and allowed to develop. The egg white also provides cushioning and protection for a developing embryo.  As eggs age, their protein structure degrades. This causes older egg whites to become more runny, and the yolks to stand less round and tall. 

In the center of the egg is its most familiar component: the yolk. The egg yolk is full of the vitamins and minerals, as well as cholesterol and fat, that the baby chick requires in order to develop properly. The color of the yolk depends greatly on the chicken’s diet.  The egg yolk is held in place by the chalazae.  Of note is the fact that the more visibly prominent the chalazae, the fresher the egg.

More on egg storage...

Once eggs are refrigerated, they should be kept in the refrigerator, washed or not. According to the USDA, “a cold egg left out at room temperature can sweat, facilitating the movement of bacteria into the egg and increasing the growth of bacteria”. Therefore, refrigerated eggs should not be left out for more than 2 hours at room temperature. 

Store the eggs on a central shelf in the refrigerator. Many people think stashing their eggs on the inside of the door is more convenient. However, the main body of the refrigerator is better for preserving eggs because it allows them to maintain a more consistent temperature. To maximize their lifespan, keep your eggs at around 40 degrees F or cooler.

We have a refrigerator that we store eggs in before taking out on delivery or to the Co-op.  BUT we are still hoping to expand the egg business (once the coops get built) and there will come a time when we will not be able to put all the eggs in one refrigerator.  

Our house came with a root cellar.  It is built into the side of a hill and under the garage.  One side is exposed and there are 2 windows in it.  I am not sure why there are windows (because normally in a root cellar you would want it to be dark) but I am glad there are because we were able to make some modifications to the root cellar to turn it into a walk in cooler for the egg storage!

Here is a pic of our root cellar before we converted it to a walk in cooler.  We were fortunate that there was some shelving.  The windows are on the right in the pic.
We hired a contractor to build a "wall" and put a door in to access the cold room.  
We needed to make the cellar smaller so that a window air conditioner could cool the area down.  We mounted the air conditioner in the window and hooked up a Cool Bot.  The Cool Bot tricks the air conditioner into running and cooling it down to 40 F in the cold room!
Air conditioner on the left hooked up to Cool Bot on the right

Because the root cellar is partially underground, the humidity in the root cellar is higher.  
To increase the humidity more, we have several bins of wet sand in the cold room.
Here is a pic of the humidity reading in the refrigerator.  It says 38%.  A fridge is great for short term storage but for longer egg storage, it is great to have the higher humidity.
Most of our egg customers get fresh eggs each week so this is really not a concern for them.  We also like that most all eggs are sold within a week.  BUT if we do get to the point that we need extra storage space...we have plenty space with the walk in cooler!  Of course, we also store other things in the walk in cooler and I think that might be the subject of my next blog post...winter cold storage of fruits and vegetables...

I was in hurry to get this blog post out...hopefully, most of this makes sense...let me know if you have any questions!

Have an eggcellent day!
~Denise